Source: Lotus West
Author: Garth Lippmann
Date:
Title: WATER PUMP REPLACEMENT - LOTUS TWINCAM ENGINE
LW# 26CS021
COSTS - As is true with many maintenance problems, the major factor in replacement is labor, not parts. This is because the replacement of the pump is a real chore. Labor alone at a shop (if you can find one to do it) probably runs $50 or more, plus machine shop fees and parts. Thus, there is great financial incentive for doing the job your self, in addition to seeing it done right. The pump assembly is mostly Ford Cortina components. The pump repair kit costs $12.12 (with Club discount), and the required gaskets will cost about $4.00 more.
FAILURE SYMPTOMS - The critical point in the pump is the shaft, which has pre-lubed bearings. Some of the symptoms of a failing unit are squeal, excessive play when flexing the fan blade, and outright wobble. The rubber seal used at the inward end of the shaft may leak, but probably won't unless installed incorrectly. If the seal leaks, it will be detected from drippings at the front of the oil pan and may be traced to a small bleeder hole at the base of the shaft on the outside of the front timing chest case.
OPTIONS- You can save yourself a major part of the labor cost by removing the pump yourself. You then have two options, at the time this is being written: 1) Disassemble the pump and replace the worn parts yourself, or 2) Exchange your pump for a rebuilt unit at Villa Ford (see Parts & Discount List for address). If you choose 2) you may skip from the end of the “Pump Removal” section of this article to the “Pump Installation” section.
TOOLS & PARTS - You'll require the usual tools such as sockets, torque wrench, etc. (a set of ¼” drive sockets is handy to get at some difficult-to-reach sump bolts) plus a pulley puller and, possibly, a slide hammer. (The PROTO 4056 set is recommended.) If you elect the exchange option, you'll still require the following parts:
Head-to-timing chest gasket
Inner timing chest plate-to-block gasket
Pan gasket set
Cam cover gasket (may reuse old one)
Pump-to-backing plate gasket (optional, but desirable)
Gasket sealers/rep1acements (Gaskacinch, Plastic Gasket)
Front crankshaft oil seal (optional replacement)
If you rebuild the pump yourself, you'll need all of the above, of course, plus access to a press and
Water Pump Kit (Ford Part #681F 8591-AA)
PUMP REMOVAL - The following presumes that the water pump is being removed from an Elan or Lotus Cortina. Set the engine at TDC to fire number one cylinder, noting the position of the distributor rotor. Drain the radiator and block and pull the radiator. Remove the fan and fan pulley by hand. Pull crank pulley with the puller, but leave the key in its groove. Remove the starter to gain access to the sump bolts. Remove all 18 oil pan bolts and drop the oil pan away from the block (oil drain optional). These latter steps are necessary as the timing chest plate includes holes for the pan bolts. Don't remove the frame crossmember. Pull the cam cover to remove the front bolt holding head to timing case. Don’t forget the two vertical bolts at the side of the head. LEAVE HEAD ON ENGINE. Remove the cam sprockets after loosening the chain tensioner and let the chain drape. Remove all timing chest bolts. Two of these are dowel bolts so you want to keep them in order. The easiest way to do this is to outline the timing chest cover on a piece of cardboard, punch holes at the bolt locations, and insert the bolts as you remove them from the cover. The front chest cover MUST come away first, as the water pump is housed in this cover. If it won't come away use a slide hammer on the fan pulley hub until the pump comes free with the plate as a unit. This can be a very stubborn job, but nothing is holding the timing chest cover when all the bolts have been removed except corrosion. The HEAD IS NOT TO BLAME. The fan pulley hub is just pressed on the water pump shaft and vigorous use of the slide hammer may pull it off before the pump comes free. In that case clamp down on the shaft with a pair of Vise Grips as hard as you can (don't worry, this is one of the parts that is replaced), fit the slide hammer around the Vise Grips as best you can and keep banging away until the corrosion bond fatigues. Resist the temptation to do any prying on the plate. When you get the pump out (and you will) the second plate will now be exposed. It is not really necessary to remove this plate, but at this point there are only a single hold-down bolt and two jackshaft sprocket bolts to go. It is then easy to renew the gasket between that plate and block. Besides, by now you have probably damaged that gasket, haven't you?
WATER PUMP REBUILD - Once the timing chest cover has been freed from the backing plate, the next job is the removal and rebuild of the pump itself. If the hub has not been pulled off by your efforts with a slide hammer, use a puller. A press of some sort will be required to disassemble and reassemble the pump. Remove the bearing lock wire with pliers. Set the timing chest cover in the press, supporting it on the gasket surface around the impeller housing. Press out the shaft and bearing from front to back, pressing against the outer bearing housing. A Craftsman 11/16" extended socket is ideal for this purpose.
With the impeller shaft and bearings out, the impeller housing can be removed. Clean this up and save it, as some rebuild kits do not contain this item. Also clean the seal seating surfaces in the cover, removing and corrosion deposits, and the small bleed hole to the outside of the cover. You will notice a ¼-inch hole adjacent to the top bolt hole around the pump. This is a bypass to the head. Often the corresponding orifices in the aluminum back plate and the block become blocked. Clean these out with a stiff wire.
The water pump repair kit mentioned at the beginning of this article contains the pump shaft and bearing assembly, a seal, an impeller; the brass slinger, a water pump-to-backing plate gasket, a washer-like object, and a bearing lock wire. Reuse the old “O”-rings. These pieces go together as shown in the sketch:
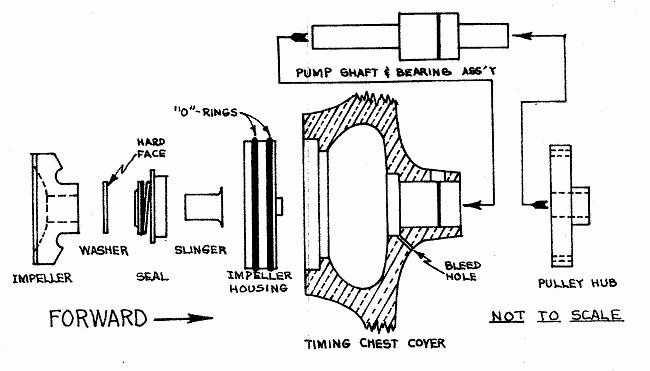
First, press the brass slinger onto the long end of the pump shaft, wide end first, using a socket and tapping gently. Press to within about 1/16" of the bearing. Coat the seal seating surfaces in the cover with your 1avorite gasket sealant. Set the timing-chest cover face up in the press, supporting it on the bearing surface around the pump impeller housing. Insert the pump shaft with bearings, long end first, into the front of the cover and, using the same socket as you used to remove the old shaft, press the new one in. DO NOT PRESS ON THE PUMP SHAFT. Press until the lock wire groove in the bearing housing lines up with the one in the cover. Remove the timing chest cover from the press and turn it over. Install the "O"-rings back on the now-cleaned impeller housing. Using your hand, line the tab on the housing up with the slot in the cover and push it into the cover until it seats. The forward “O”-ring should be contained completely within the cover.
Fit the seal onto the shaft so that the hard, carbon, bearing surface faces to the rear. By hand push the seal into its housing. Next, fit the little washer-like, object onto the shaft so that its hard face bears against the carbon face of the seal. This washer rotates with the impeller and provides a smooth contact surface between it and the seal. Mount the cover in the press again, front side down this time. Support the, unit on the pump shaft this time and press the impeller onto the shaft until the blades are within about 1/32” of the housing. Remove the cover from the press, invert it, and, supporting the aft end of the shaft, press the pulley hub on. Using pliers, insert the lock wire into its groove.
Renewing the crankshaft oil seal is optional but advisable at this time, if you have access to a press. If you can find a socket large enough, press out the seal from the rear, pressing on the seal shell. Press the new one in with the beveled edges facing toward the engine.
If your Twincam happens to be one of the older ones (pre '67), this would also be a good time to check to see if you have the later model earn chain dampener on the left side of the timing chest cover. The later ones look like the sketch below:

If you replace this be sure to apply Loctite to the fastening screws to prevent them from backing out and fouling the chain. Incidentally, if that chain has more than 60,000 miles on it, you might find that you can add a little life to your engine by renewing it. Cam chain stretch can displace your valve timing by several degrees. Do it now while the chain is accessible.
PUMP INSTALLATION - Once you have the pump pressed back together the fun begins. Rather than cop out with the usual English tag line: reassembly is the reverse some suggestions are in order. If the backing plate has been removed, clean it up. The factory manuals recommend using the thin, waxed gasket between it and the block without sealer. The rationale for this is to prevent the sealer from clogging the tiny chain-oiling hole at the end of the groove just above the oil seal cutout. So do make sure this passage is clean.
If the head has been removed, the installation of the cork head-to-timing chest gasket is no problem. But if the head has not been disturbed, extra care is required in its fitting, as gravity will not help you hold it in place. This gasket must be installed before the backing plate, so it is helpful if some adhesive substance is used to secure it to the bottom of the head while the plate and timing chest cover are installed: Gaskacinch or Plastic Gasket are suitable if allowed to set up for a short time. The three bolt holes through the head can be used to hold it against the head while the adhesive sealer sets. Try to keep it as flat against the head as possible. The backing plate will secure the back of the gasket at this time. So line up the waxed paper and cork gaskets, and secure the backing plate to the block with the single bolt below the impeller housing. While replacing the jackshaft sprocket, remember to lock the bolts by bending the tabs against them.
Before mounting the timing chest cover, thread the cam chain around the crank, jackshaft, and idler sprockets. Mount the slinger on the crank with the concave face forward. Spread a sealant over the cover-to-head and cover-to-back plate contact surfaces. It is also a good idea to use a pushrod Cortina water pump gasket around the impeller housing. Recent rebuild kits are including this item. Using the two dowel bolts, ease the cover plate upward and back, carefully compressing the cork gasket. A thin feeler gauge is useful in flattening this gasket as the bolts are drawn up. Once this is done successfully, and the cover is bolted securely, allow the sealer some time to set, perhaps overnight.
The pan gasket must be renewed. Using a gasket scraper, remove the remains of the old gasket and clean off the mating surfaces. Apply some Gaskacinch to both sides of each gasket and allow it to dry. You may fit a new rear crankshaft seal. If the pan is removable, you have an easy job. If it only drops down an inch or so, the task is Herculean. No advice offered on this. Lay the dry pan gaskets along the oil pan sides, noting that the gaskets are not identical. One has a straight section at its forward end. This goes on the oil pump side of the engine. Give yourself ample room beneath the car to work. Line up the holes by screwing in the 18 bolts a few threads at a time. The two long rear bolts go in reasonably easily using 1/4" drive sockets with extensions, providing the gasket hole is lined up. Tighten the bolts up progressively, using the same type of spiral pattern out from the center as used in tightening a head. Go easy on the front four, as they are tapped into aluminum. As a final touch torque each bolt to the specified 8 foot-pounds.
Now all the other stuff can go back on. Using a socket, tap the crank pulley back on then mount the water pump pulley. Making certain that the #1 piston is at TDC and that the chain tensioner is slack, reinstall the cam sprockets, inlet first. A Vise-Grip on the exhaust cam will help you make small angular adjustments to the cam while the other hand is mounting the sprocket over its dowel. Make sure the marks on the sprockets are horizontal and facing each other when the notch on the crank pulley is at TDC. Tighten the tensioner to allow ½” slack between the cam sprockets. Remove the distributor and reinsert it so that the rotor points to the 10 o'clock position. Attach fan belt, install radiator and connect all radiator and heater hoses. Refill sump and radiator. Attach cam covers. Check tightness of all bolts on timing chest cover, head, and generator. Check hose clamps and wiring connections. Start engine and retime.