Source: Lotus West
Author: Alex Bollinger
Date:
Title: MINOR FIBERGLASS REPAIR
LW# 00BI002
To make minor structural repairs on the fiberglass body of your Lotus is nothing to be afraid of. It requires the selection of proper materials and a minimum amount of know-how. Unfortunately, the know-how is one of those things best learned by doing.
This paper covers only the minor repairs such as split fenders, stress cracks, etc. Some of the things covered here are applicable to the more difficult repairs. For instance, replacing body sections, and adding fender flares. These require the making of a mold and it gets too involved to cover in this article.
To begin with, purchase the materials shown in the attached list. Find a place to work where the fiberglass dust will not bother anyone and put on some old clothes. It helps to wear a long sleeved shirt. Fiberglass dust does irritate the skin so avoid getting it on you if possible. If a great deal of fiberglass work is going to be done, I strongly recommend the use of a respirator.
So to work… Examine the damaged area carefully. Look for such things as broken bonds between panels or flanges or structural damage to other components. Is the fiberglass damaged sufficiently to require a replacement panel? If necessary, remove components to fully assess the damage. It is a good idea to use a marking pen to show the area that's going to be repaired, particularly if there are several of them.
Let's take the two most common types of repairs and go through them:
Fracture or Tear (See figure 1)
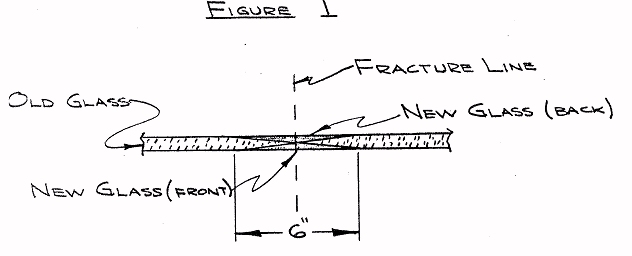

Clean off the back of the fracture (if accessible) with acetone. Using the drill motor and coarse sanding disc, grind approximately half way through the thickness of the fractured material on the back side. Taper the grinding from the fracture line out in both directions about 3 to 4 inches. Cut two or three strips of fiberglass 6-8 inches wide and the length of the fracture. The number of strips required will depend on the weight of fiberglass mat purchased. If the mat is too thick, split the layers in half. Wipe off the area you are going to glass with acetone. Pour some fiberglass resin in a mixing cup and add the required amount of catalyst. If in doubt as to the amount of catalyst, add 4 or 5 more drops. It is a mess if you don’t have enough catalyst added so add the extra drops. A very important point to remember when mixing catalyst in the resin and resin filler is, mix it very thoroughly. After mixing the resin and catalyst, use a paintbrush to apply the first layer of resin to the back of the fractured area. Take a strip of fiberglass and lay it along the fracture line overlapping it equally on both sides of the line. Apply more resin with the paintbrush until the strip is saturated. Work out as many air bubbles as is possible with the paintbrush. Repeat the application of strips until the desired thickness is reached. Keep in mind to do as neat a job as possible on the back side of a repair if the repair if the repair can be seen. A future buyer may be turned away at a future date, by poor workmanship. After the backside has set up, repeat the same steps on the outside. When applying the strips to the outside, build up the thickness a little more that is needed. It is easier to grind off the excess than mix up a new batch of resin. When grinding the outside, grind down to the new glass that vas applied to the backside. A helpful hint for working on the outside is to cover the area surrounding the fracture with masking tape. This will keep the paint from being damaged more than is necessary.
When the fiberglass has cured (not sticky) take the drill motor and coarse disc and grind the new glass to the approximate height. Take the large wooden sanding block and #50 dry paper and sand to the correct shape and height. If the repair looks sound re-sand with the woodblock and #100 dry paper. Feather in with the paint edge and wipe off the area with a dry rag. Run your hand over the repaired area in several different directions checking for surface undulations. Be sure to use the entire flat of your hand and not just the fingers. There will be a few imperfections in the surface but there should be nothing greater than 1/16-inches deep. If by chance there is, it will have to be built up with glass.
The next step is to clean the grinding and sanding dust out of the pinholes. This is important. If the dust is not thoroughly cleaned out, the hole will be difficult to fill. An improperly filled hole will result in a sunken spot in the paint later on. To fill the pinholes mix 50% clear resin with 50% resin filler. Add the catalyst and stir thoroughly. Using the small, rubber, sanding block as a squeegee, apply the resin mixture being careful to work it into all of the pinholes. Leave an excess thickness of about .030 on the newly repaired area. Be sure to smooth the mixture out as smooth as possible. After the mixture has dried, apply some acetone to a rag and wipe the surface off. Don’t get the acetone on the paint. This will prevent the sand paper from gumming up. Sand with #50 dry paper and the wooden block to knock down the high spots. When the shape is approaching the finished product, switch to #100 wet sandpaper and finish sanding the entire area. After this, the repair should be ready for primer.
Stress Cracks
The most common type of damage is the stress crack. It is normally not a structural defect, but it requires as much attention to do the job properly. Again, I suggest that you mark each spot with a felt marking pea and apply masking tape to protect the paint in the area around the repair. Use the drill motor and coarse sanding disc to grind the area around the crack. Grind approximately .040 inches deep and one inch on each side of the crack (see figure 2).
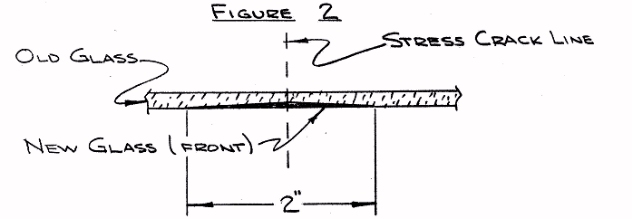
If there is a maze of cracks spread over an area of a square foot or larger, grind the entire area. It requires a great deal more time to do each crack individually and the job isn’t as neat. Wipe the area with ace tone and proceed with the fiberglassing as described in the previous repair description.. The thickness of mat should be about 1/2 layer. Be sure to use the small, rubber, sanding block as a squeegee to remove most of the air bubbles and excess resin. After the resin is cured, use the large wood block and #50 dry paper to sand into rough shape. Switch to #100 dry paper and finish the final sanding. Clean out the pinholes of sanding dust and wipe off with acetone. Apply the 50 - 50 mixture of resin and resin filler to fill the pinholes. Finish up as detailed in the previous section.
MATERIAL AND EQUIPMENT
1. Sand Paper
a. #100 wet & dry – hand
b. #220 wet & dry – hand
c. #50 dry – hand
d. Coarse (disc) - machine
2. Sanding Blocks
a. Solid rubber 2˝” x 5” - H.M. Parker
b. Wood 4” x 7” x 1” - Make
c. Rubber 2” x 3” x Ľ” - H.M. Parker
3. Fiberglass
a. Mat - Boat shop
b. Cloth – woven - Boat shop
c. ˝-gal. Resin (polyester) clear - Boat shop
d. 1-qt. Resin (polyester) filler - H.M. Parker
e. Catalyst for both c & d
4. Primer Putty (small tube) - H.M. Parker
5. 1/4 or 3/8 Drill
a. Rubber grinding disc
b. Set of drills
6. File (very coarse, 1/2" round)
7. Putty knife
8. Mixing cup
9. Stirring sticks
10. Paint brushes (cheap, ˝-dozen, 1” wide)
11. ˝-gallon Acetone
12. Lots of rags
13. Respirator (optional)
14. Marking pen (ink type)
15. Scissors
16. Toothbrush
17. File card
18. One roll 2” wide masking tape